
How to Set Up a Laptop with Rentablez Guard?
Install Device Guard on each laptop before you hand it to the customer. It takes a couple of minutes per laptop.
Two Ways to Install
- With an activation code — you generate a code for the laptop’s unit in the Guard app, and the laptop links to that unit as it installs.
- Without a code — the laptop installs first and shows a short pairing code; you then pair it to a unit in the Guard app. Handy when you set up many laptops at once.
Get the setup file for the laptop’s operating system from Rentablez support:
RentablezLockAgent.exefor Windows,RentablezLockAgent.appfor Mac, or the.debpackage for Ubuntu and Debian.
Step 1 — Generate the Activation Code (code route only)
- Make sure the laptop exists as a unit with its asset tag (Inventory, or Add laptop on the Devices page). Installing without a code? Skip this — you can create the unit while pairing.
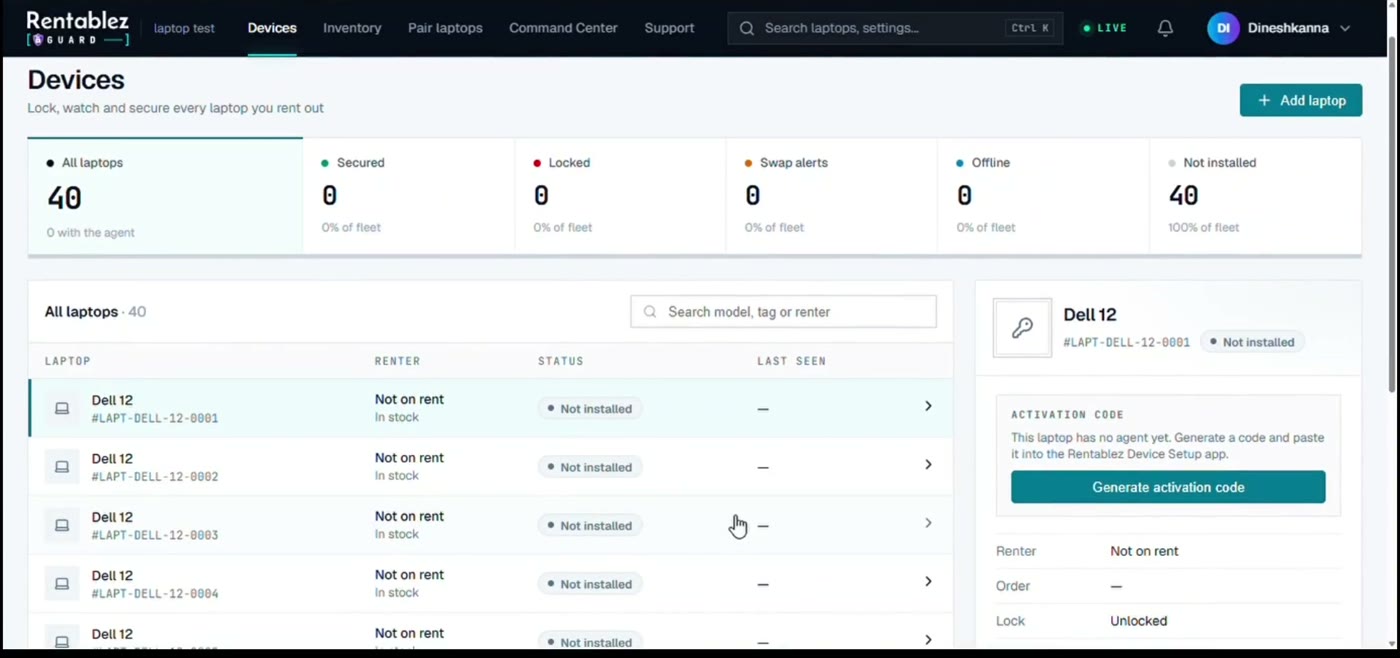
- Open Devices, select the laptop and click Generate activation code. (In the main Rentablez app: Settings → Device Guard.)
- Copy the code. Keep it private: it identifies that one laptop.
Step 2 — Open the Setup App on the Laptop
- Windows: double-click
RentablezLockAgent.exe. - Mac: log in as the account the customer will use, then open
RentablezLockAgent.app. - Linux: see Linux laptops and servers below.
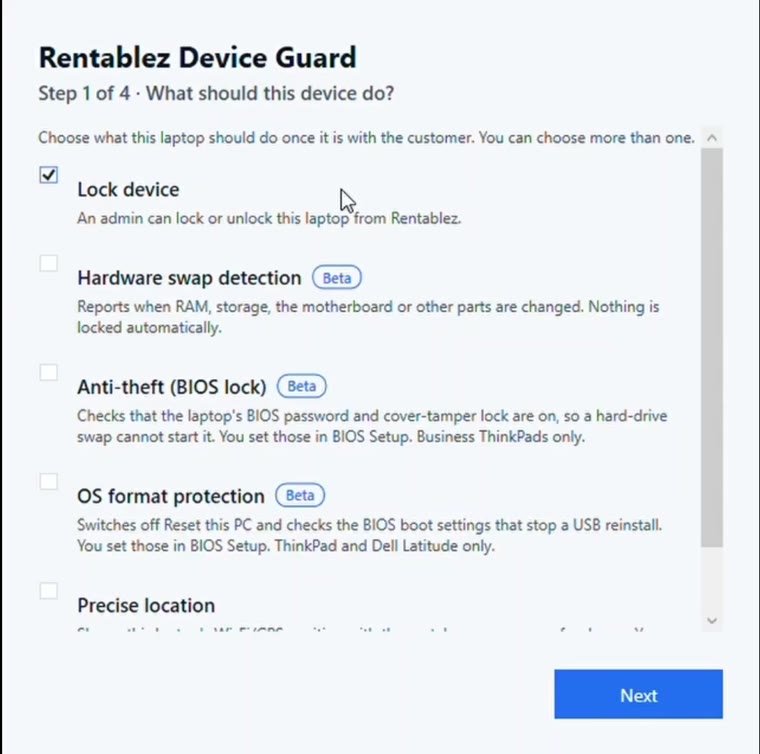
Step 3 — Choose the Protections
Tick what this laptop should do:
- Lock device — lock or unlock it from Rentablez.
- Hardware swap detection (Beta) — alert when RAM, storage or other parts change.
- Anti-theft (BIOS lock) (Beta) — business ThinkPads only.
- OS format protection (Beta) — ThinkPads and Dell Latitudes only. Set the BIOS steps first (below).
- Precise location — tick it only after the customer has agreed; the setup app asks you to confirm.
Step 4 — Paste the Code, or Continue Without One
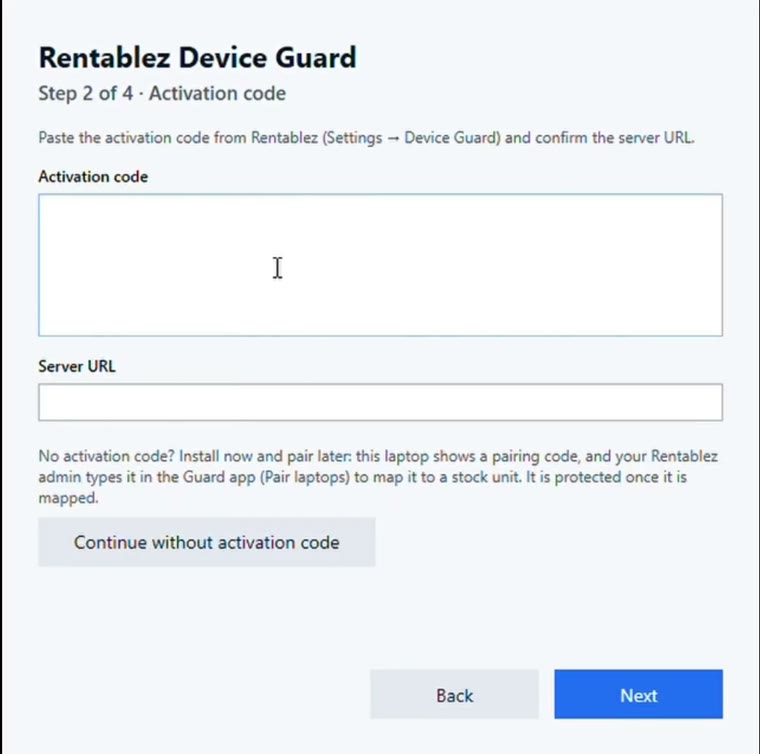
Paste the activation code — the server address fills in automatically — and click Next. No code? Click Continue without activation code.
If you ticked hardware swap detection with a code, review the hardware scan and tick This is the laptop’s original hardware. Without a code, the laptop records its hardware by itself once it is mapped.
Step 5 — Install
Click Install. On Windows, approve the administrator prompt; on a Mac or Linux, enter the administrator password. A progress bar shows each step: administrator approval, installing the service, connecting to Rentablez, saving the hardware baseline and starting protection.
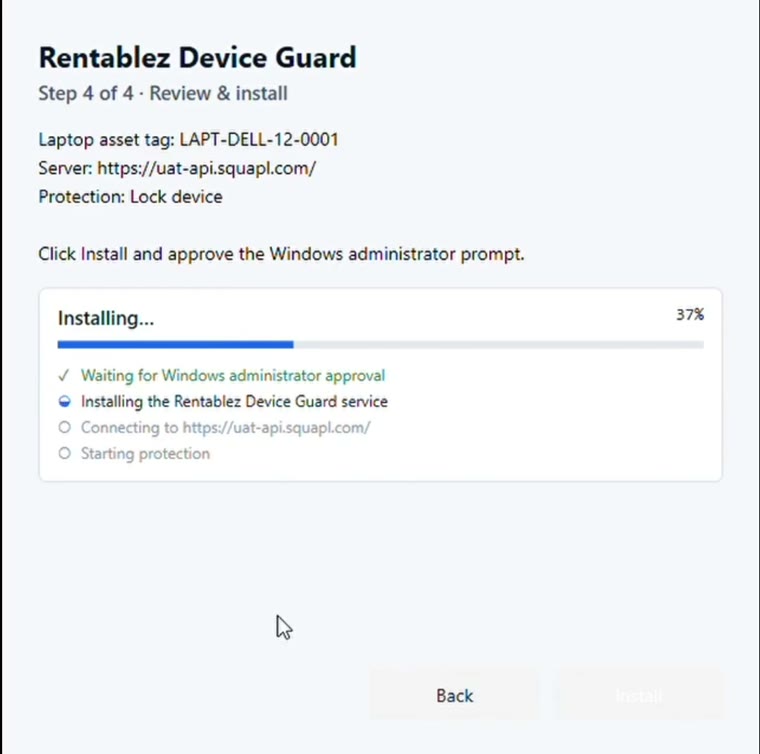
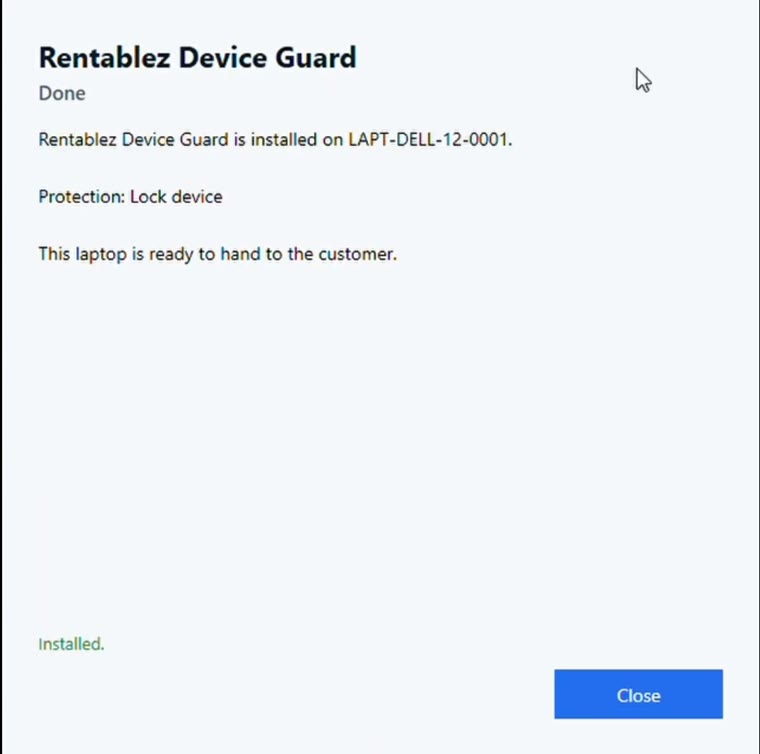
When it finishes, the setup app says the laptop is ready to hand to the customer.
Step 6 — Pair the Laptop (no-code route only)
The setup app shows a pairing code such as K7P4-QX2M.
- In the Guard app, open Pair laptops, type the code under Enter a pairing code and click Pair.
- Click Map to unit, then pick the laptop’s asset tag under Existing unit, or click Create a new unit for this laptop.
Protection starts within a minute of mapping.
Pairing rules. The laptop must be online during setup to get its code. A paired laptop counts toward your laptop limit from the moment you pair it, even before it is mapped, and it cannot be locked until it is mapped. An unpaired code stops working after 7 days and the laptop shows a new one. Changed your mind? Remove the paired laptop to free its seat.
Step 7 — Check It in the Guard App
Within a few seconds the laptop shows Secured on the Devices page. It is ready to hand over.
Linux Laptops and Servers (Beta)
- Install the package: open
rentablez-guard_1.13.0_amd64.debin the Files app, or runsudo apt install ./rentablez-guard_1.13.0_amd64.deb. - With a desktop: open Rentablez Guard from the app menu, choose the protections, paste the code (or Continue without activation code) and click Install. Switch on This machine is a server only if Lock should also cut its network.
- Without a desktop (over SSH): save the code to a file and run
sudo rentablez-guard install --code-file code.txt(add--serverfor the network cut). With no code, runsudo rentablez-guard install --no-code; it prints a pairing code to enter in Pair laptops. - Check with
rentablez-guard status. - Give the customer a standard account without sudo, and set a GRUB password.
BIOS Steps for OS Format Protection
Set these by hand in BIOS Setup before you tick OS format protection. Guard checks them every day but never changes them.
Lenovo ThinkPad
- Restart and press F1 at the Lenovo logo.
- Set the supervisor password first: Security → Password → Supervisor Password.
- Config → USB → USB UEFI BIOS Support → Disabled (blocks booting from USB; ordinary USB devices still work in Windows).
- Startup → Boot Device List F12 Option → Disabled.
- Startup → Boot Order Lock → Enabled (if your model shows it).
- Startup → Boot: keep only the internal drive (Windows Boot Manager).
- Check Security → Secure Boot → Secure Boot Enabled.
- Press F10 → Yes to save. For BIOS anti-theft, also turn on Bottom Cover Tamper Detection under Security.
Dell Latitude
- Power on and press F2.
- Set the admin password first: Security → Admin Password.
- System Configuration → USB Configuration: untick Enable USB Boot Support. Leave Enable External USB Port ticked. Untick Thunderbolt Boot Support if it exists.
- Check Secure Boot → Secure Boot Enable.
- Click Apply, then Exit.
Keep the BIOS password safe. Only you should know it. If it is lost, a locked machine may need a paid motherboard replacement.
Changing or Removing the Agent from the Laptop
Opening the setup app again on a protected laptop shows a Manage screen with your organisation name and the laptop’s asset tag. Set up again changes the protections. Request uninstall sends you a request in the Guard app — the agent is removed only if you approve it. See Approve an uninstall request.