
How to add company information?
Think of your Organization Settings as your business’s ID card. Set your name, logo, contact numbers, and address once, and Rentablez automatically stamps them on every quote, invoice, and email you send — so your documents stay consistent without you re-typing anything.
To add your company information, head to Settings > Organization Settings.
Who can edit this? Anyone can view the page, but the Save button only appears for users with the
settings.writepermission. If you don’t see the Save button, ask an administrator to grant you settings access.
How It Works
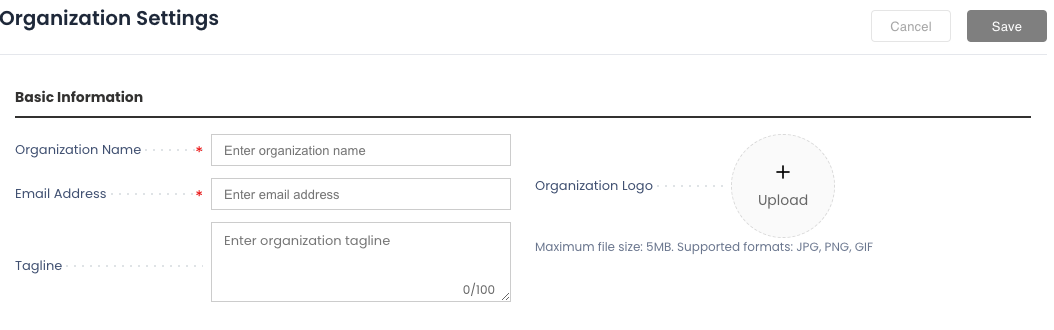
The Organization Settings page is a single form split into three sections — Basic Information, Contact Details, and Address Information. Fill in your details, then save. Once saved, these details flow automatically into your documents (quotes, invoices), customer communications, and your webstore — saving you time and keeping everything consistent.
Basic Information
- Organization Name (required): Your business name as it appears on invoices and documents.
- Email Address (required): Main email for system notifications and customer-facing documents.
- Tagline: A short phrase describing your business, e.g. “Premium Camera Rentals” (up to 100 characters).
- GST Number (India only): This field appears only when your country is set to India. Enter your GSTIN for tax compliance on invoices.
- Industry: Shown as a read-only field once your industry is set. To change it, contact customer care.
- Organization Logo: Upload your company logo. For best results, use a landscape logo (roughly 4:1 width-to-height, at least 240 × 64 px) with a transparent background.
Logo requirements: Supported formats are JPG, PNG, and GIF, with a maximum file size of 2 MB. A transparent PNG works best. Files over 2 MB are rejected with an on-screen message.
Contact Details
Each number is validated as a 10-digit value.
- Phone Number: Main business landline or contact number.
- Mobile Number: Primary mobile contact.
- WhatsApp Number: The number customers can reach you on via WhatsApp.
- Mobile Number 2: An additional mobile number if needed.

Address Information
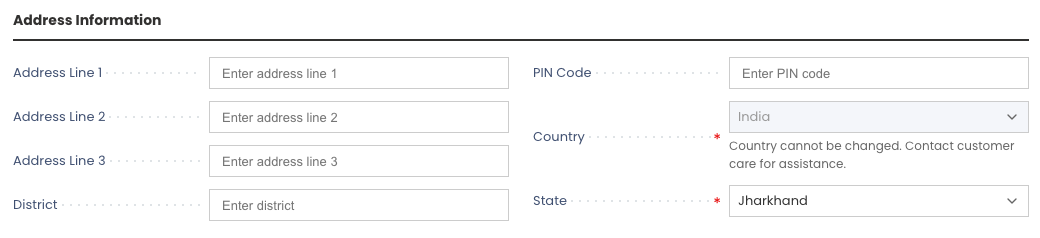
- Address Line 1: Primary street address. Start typing to search — the address autocomplete suggests matches and can auto-fill the rest of the address for you.
- Address Line 2 and Address Line 3: Additional address details.
- District: Your local area or city.
- PIN Code: Your postal code.
- Country (required): Select from the dropdown.
- State: Select from the dropdown — the list updates based on the country you pick. State is required when the country is India.
Faster entry with address search. Begin typing in Address Line 1 and pick a suggestion. Rentablez auto-fills Address Line 2, District, PIN Code, and State (when it can match one) from the selected result — so you rarely need to type each field by hand.
Country is locked after your first save. Once your country is set, the dropdown becomes read-only and shows the note “Country cannot be changed. Contact customer care for assistance.” This protects tax and regional settings that depend on it. Reach out to customer care if you genuinely need to change it.
Saving Your Changes
Once you’ve filled in the required fields, click the Save button in the top-right corner of the screen. Rentablez updates your profile immediately, and any new documents generated from that point on reflect your changes. If you change your mind before saving, use Cancel to revert the form to its last saved values.
Danger Zone: Deleting Your Account
At the bottom of the page, administrators (users with full admin access) see a Danger Zone section with a Delete Account option.
This is permanent. Deleting your organization account removes the organization and all associated data, and it cannot be undone. Only use this if you are certain you want to close the account. Non-admin users do not see this section.
Your organization settings are now configured. These details will appear across all customer communications and business documents in Rentablez.