
Configuring Roles & Permissions
Not everyone on your team needs to see everything. Roles let you build custom access levels — like a “Warehouse Staff” role that can check gear in and out but can’t open financial reports, or a “Delivery Agent” role that only sees the orders they need to fulfil. You define a role once, then assign it to as many team members as you like.
To open the Roles list: Go to Settings > Users & Access > Roles.
Creating and editing roles requires the Roles write permission (or Full Admin Access). Team members without it see the list in read-only mode.
System Roles vs. Custom Roles
When you sign up for Rentablez, your account is automatically given the Admin role.
- Admin (system role): This role is protected. You cannot edit its permissions or deactivate it — it always has full access. This ensures you can never lock yourself out of your own account.
- Custom roles: These are the roles you create for your staff (for example Sales, Technician, Accountant, Branch Member).
How to Create a Role
You can build a role from scratch, or use one of the two quick-start shortcuts covered further down.
- Go to Settings > Users & Access > Roles.
- Click Add Role.
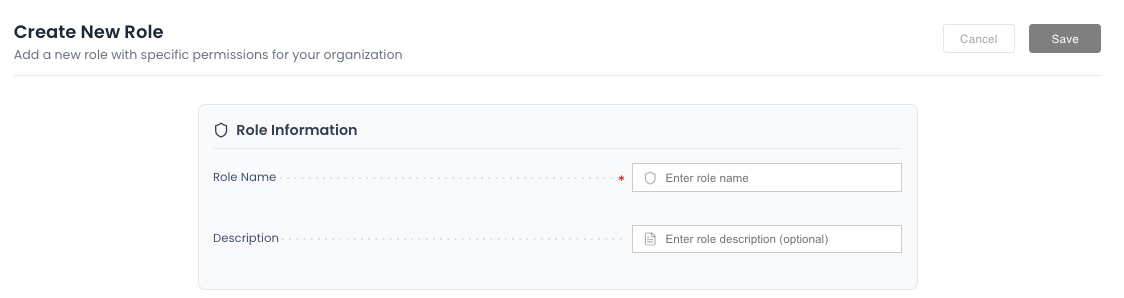
- Fill in the Role Information:
- Role Name (required) — a clear name such as “Junior Staff”. Letters, numbers, spaces, hyphens, and underscores are allowed.
- Description (optional) — a short note about what this role is for.
- Tick the permissions you want the role to have (see below).
- Save the role.
Understanding Permissions
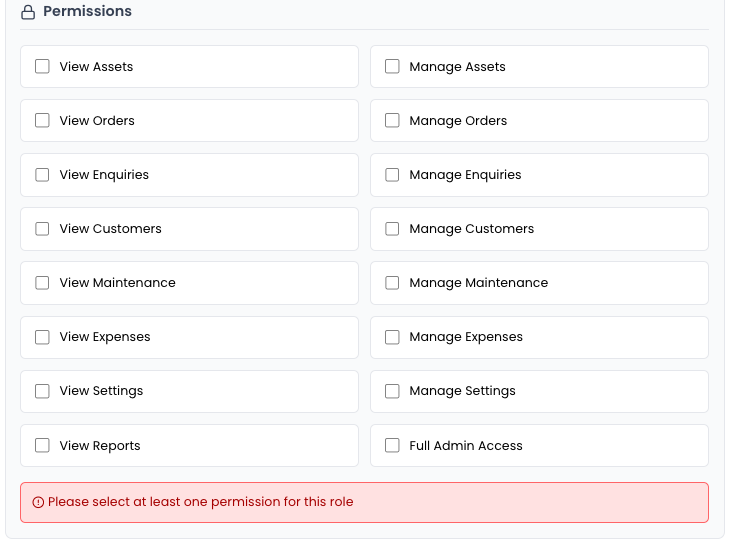
Permissions are grouped by area of the app (Assets, Orders, Payments, Invoices, and so on). Most areas offer two checkboxes:
| Permission | What it allows |
|---|---|
| View | The user can see the data but not change it. Example: a technician viewing the Orders list to know what to prep. |
| Manage | The user can create, edit, and delete. Example: a sales manager creating new orders. |
A few areas add extra fine-grained actions on top of View and Manage — for example Waive Off Invoice and Delete Invoice under Invoices, or Reverse Payments under Payments. Tick only the ones the role should be allowed to do.
Two things the form does automatically to keep permissions sensible:
- Manage implies View. Ticking a “Manage” box automatically ticks its matching “View” box — you can’t grant edit access without read access. Removing “View” also removes “Manage”.
- Selecting everything becomes Full Admin Access. If you tick every individual permission, the form collapses them into a single Full Admin Access grant.
Full Admin Access
At the bottom of the permission list sits Full Admin Access. Ticking it grants the role everything — every current module and any modules added in the future. Be careful who you give this to; treat it like a master key.
Some permission areas only appear if your subscription plan includes that feature (for example Stores Inventory, Financing, or Depreciation). If you don’t see an area, it isn’t part of your current plan.
Quick-Start Role Shortcuts
The Roles list header offers two shortcuts that open the create form pre-filled for common field-team situations. You can still adjust the name and fine-tune permissions before saving.
Branch Member Role
Click Branch Member Role to create a role for staff who run day-to-day operations at a branch. It comes pre-filled with the standard business permissions (assets, orders, customers, invoices, and so on).
Users & Access settings and Branch Management settings are permanently restricted for this role type and cannot be added — a branch member can run the business but can’t create users or edit branches.
Delivery Agent Role
Click Delivery Agent Role to create a tightly scoped role for field delivery staff. Only Operations and Orders (view) permissions are available — everything else is permanently restricted, so a delivery agent sees just what they need to complete a drop-off or pickup.
Activating & Deactivating Roles
Every role has a status toggle in the list. Deactivating a role keeps its history but makes it unavailable for assignment to new or existing users — useful when you retire a role without deleting it. Reactivate it any time to make it assignable again. Rentablez asks you to confirm before changing the status.
The Admin role cannot be deactivated.
Assigning a Role
A role does nothing until it’s attached to a person. Once you’ve saved the role, open the Users page and pick the role when you add or edit a team member.